


How to Choose Insulated Combination Pliers
Choosing the right Insulated Combination Pliers starts with the work, not the color of the handles. These tools combine gripping jaws, cutting edges, and insulated grips for electrical tasks. A pair that feels solid on a workbench may feel awkward when reaching into a crowded panel. Small details matter. Check the insulation rating and markings, then confirm they suit the task and applicable standards. Ratings are not interchangeable, and a printed label alone does not prove a tool is undamaged or appropriate.
Look closely at the jaws, pivot, cutter, and handle surfaces. The jaws should meet cleanly, while the joint should move smoothly without excessive play. Notice any cracks, cuts, exposed metal, or loose insulation. Do not use damaged tools. Fit matters, too. A comfortable grip should allow controlled pressure without forcing your wrist into an awkward angle. Still, there is no perfect pair for every hand or job; that part is easy to overlook when comparing specifications.
This guide explains how to compare insulation ratings, materials, jaw designs, cutting capacity, and handle comfort. It also covers inspection and care, because even quality tools need regular checks. Insulated pliers are not permission to work on energized equipment. Follow safe work procedures, isolate circuits when possible, and verify conditions with suitable test equipment. A careful choice helps. Good habits matter more.
Understanding the Design and Uses of Insulated Combination Pliers
How to Choose Insulated Combination Pliers
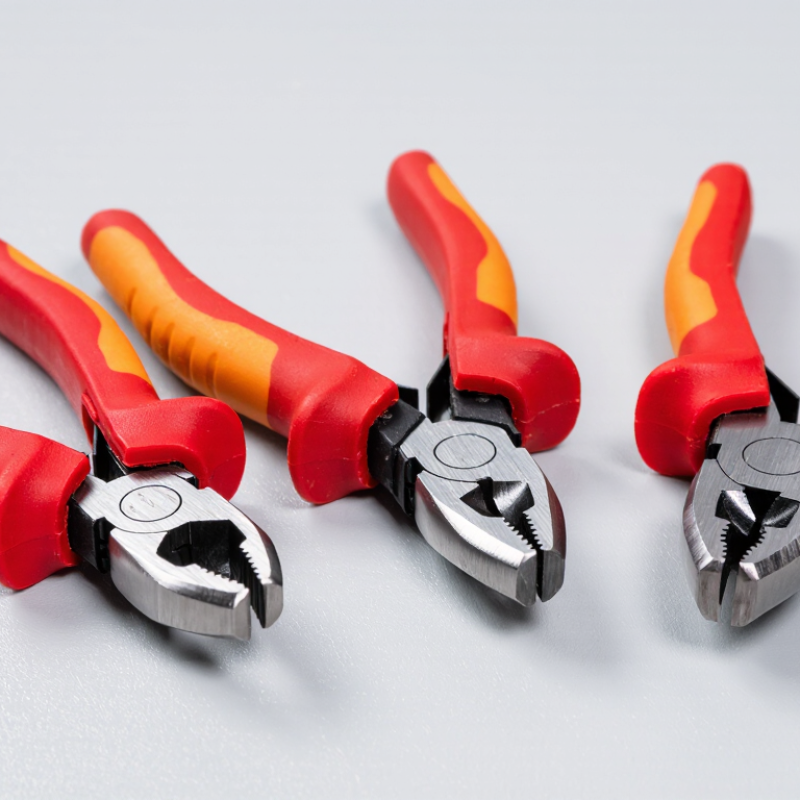
Insulated combination pliers bring several everyday tasks into one tool. Their serrated jaws grip small parts, while the cutting edge trims wire. A central pivot lets the jaws open and close with controlled pressure. The handle insulation adds a protective barrier, but it does not make every electrical task safe. Check the tool’s voltage rating and insulation markings before use. Fit matters. Handles should feel secure, not slippery, and the jaws should meet evenly. For frequent wire work, look for cutters that leave clean edges without excessive squeezing.
Tips: Inspect the insulation for cuts, cracks, or worn spots before each use. Keep the jaws clean and dry. Never treat insulated handles as a substitute for proper training or safe work procedures.
The best choice depends on what you actually do. Narrower jaws can reach crowded spaces, while broader jaws offer a steadier grip on larger parts. If you often cut wire, pay attention to the cutter’s position and how easily it operates. Try opening and closing the pliers; stiff movement can tire your hand. I have found that a comfortable pair often gets used more carefully, though comfort alone is no safety test. Replace tools with damaged insulation, and avoid using pliers that feel loose or misaligned.
How to Choose Insulated Combination Pliers
IEC 60900-rated insulated tools are intended for work up to 1,000 V AC or 1,500 V DC. Check the tool’s markings and choose pliers suited to the task and applicable safety rules.
These figures are standard working-voltage limits, not a recommendation to work on energized circuits. Always follow workplace procedures and verify the rating printed on the individual tool.
Matching Pliers to Electrical Tasks and Work Environments
Choosing insulated combination pliers starts with the task. A narrow nose can reach crowded terminal areas, while broader jaws give a steadier grip on cable and hardware. If cutting is part of the job, check the cutter’s stated capacity; forcing thick wire can damage the edges. Small details matter. The handle should feel secure in your hand, even when you need controlled pressure rather than a hard squeeze.
The work environment changes what feels practical. In a cramped cabinet, compact jaws may offer better access, but they can be less comfortable for repeated gripping. For damp or dusty settings, inspect the tool’s care instructions and keep its insulation clean and dry. Look for clear voltage and compliance markings, and choose a rating suited to the work. A familiar-looking handle is not proof of protection.
Before use, check the insulation for cuts, cracks, or loose sections. Do not use damaged pliers for electrical work. De-energize equipment when possible, then verify that it is de-energized with an appropriate tester. Insulated pliers add protection; they do not replace safe work practices. It is easy to focus on the voltage rating and overlook fit. Yet poor access can make a sound tool awkward, and awkward work invites mistakes.
Checking Insulation Ratings, Standards, and Certification
How to Choose Insulated Combination Pliers
Checking Insulation Ratings, Standards, and Certification
Insulated combination pliers should display a clear voltage rating, commonly 1,000 V AC for tools designed for electrical work. Treat this as a tool rating, not permission to work on energized circuits. Check the markings on the handles and compare them with the product documentation. Faded text or vague claims deserve caution.
Look for a reference to IEC 60900 or an applicable national adoption of that standard. A certification mark should be traceable to a certifier and supported by documentation; a logo alone proves little. Inspect the insulation near the jaws, hinge, and handle ends for cuts, cracks, swelling, or exposed metal. Certified pliers can still become unsafe after impact or chemical exposure. A small nick may look cosmetic, but judging it safe by appearance alone is unreliable. Insulation does not replace proper isolation, suitable protective equipment, or safe work procedures.
Tips: Wipe the handles dry and inspect them in good light before use. If markings are unreadable or insulation is damaged, stop using the tool until it has been assessed or replaced. A higher rating cannot make worn pliers safe.
| Selection Check | What to Verify | Reliable Evidence | Why It Matters |
|---|---|---|---|
| Rated working voltage | Check the tool’s marked maximum working voltage and confirm it suits the intended AC or DC application. Tools conforming to IEC 60900 are intended for work on live parts at nominal voltages up to 1,000 V AC and 1,500 V DC. | Voltage marking on the tool, packaging, or manufacturer documentation, supported by the applicable standard. | The rating is a limit for intended use, not permission to work live in every situation. Follow local electrical-safety procedures and risk assessments. |
| Applicable standard | Look for conformity to IEC 60900 for insulated tools for live working. In the United States, ASTM F1505 covers insulated and insulating hand tools. | A clear standard reference on the product or in its technical documentation. Check the edition and any local adoption required in your region. | A relevant standard defines safety requirements and test methods; a voltage claim alone does not establish conformity. |
| Insulation coverage | Check that the handles are insulated and that the insulation extends toward the head without obstructing the pliers’ intended gripping or cutting functions. | Product drawings or specifications, plus a visual inspection of the complete handle and guard area. | Exposed or damaged conductive parts can create an electrical hazard. Insulated handles do not make every part of the tool insulated. |
| Markings and traceability | Check for legible voltage and standard markings, along with identifying information such as a model or batch reference where provided. | Permanent, readable markings and documentation that can be matched to the specific tool. | Clear identification helps confirm the tool’s intended rating and supports procurement and inspection records. |
| Certification or conformity evidence | Determine whether independent certification is required by your workplace, buyer, or local regulations. Confirm that any certificate or listing covers the exact tool type and applicable standard. | A verifiable certificate, listing, or declaration of conformity, as applicable in the sales market. Check the issuing body and the scope of the document. | Certification schemes and legal requirements vary by region. A logo by itself may not prove that the specific model is covered. |
| Condition before use | Inspect for cuts, cracks, punctures, swelling, contamination, loose handles, or other damage. If the tool has a wear-indicator layer, follow its inspection instructions. | A pre-use visual inspection and the inspection, cleaning, and storage guidance supplied for the tool. | Damaged or contaminated insulation can compromise protection. Remove suspect tools from service and follow workplace procedures. |
| Tool suitability | Confirm the jaw shape, cutting edge, opening range, and handle size are suitable for the intended gripping and cutting tasks. | Published product dimensions and task requirements; use the pliers only within their stated mechanical limits. | Choosing the correct tool reduces misuse and helps preserve both the pliers and their insulation. |
Comparing Jaw Design, Grip, Size, and Build Quality
How to Choose Insulated Combination Pliers: Comparing Jaw Design, Grip, Size, and Build Quality
Start with the jaws. Their nose should meet evenly, while the gripping teeth should hold a smooth wire without excessive pressure. Check the cutter alignment, too; a visible gap can leave strands partly cut. Feel the hinge. Side play may make precise work frustrating, though a little movement is not always a defect. Jaw length is a trade-off: longer jaws reach into crowded panels, while shorter jaws offer better control in tight spaces.
Grip matters when hands are tired or gloves are bulky. Look for rounded handles that sit securely without sharp seams or slippery spots. Squeeze the pliers several times. They should open smoothly and close without pinching your palm. Size counts. A compact pair is easier to carry, but may lack leverage for thicker conductors. There is no perfect size for every task, and choosing one pair for everything can be a mistake.
Build quality includes more than a clean finish. Inspect the pivot, insulation, and tool markings, and reject units with cracks, bubbles, or exposed metal near the handles. IEC 60900:2018 covers insulated hand tools for work up to 1,000 V AC and 1,500 V DC. That rating is not permission to work on energized equipment. OSHA 29 CFR 1910.333 generally requires exposed live parts to be deenergized unless specific exceptions apply. Check the tool’s condition before each use; insulation can be damaged where it is hardest to see.
Inspecting and Maintaining Pliers for Safe Use
How to Choose Insulated Combination Pliers
Inspecting and Maintaining Pliers for Safe Use
Before each use, examine the insulation from handle ends to the joint. Look for cuts, cracks, swelling, exposed metal, or loose sleeves. Even a small nick near the jaws matters. Open and close the pliers; movement should feel smooth, without unusual looseness. Check the tool’s voltage rating and intended use, since insulated handles do not make ordinary pliers safe for electrical work. When possible, de-energize the circuit and confirm it is off with a suitable tester.
Tips: Wipe the handles with a clean, dry cloth. Keep the tool away from solvents, sharp edges, and excessive heat. Never cover damaged insulation with tape or use a tool with uncertain markings; replace it or have it assessed by a qualified person. Store pliers where the handles cannot be crushed or scraped. Simple care helps, but it cannot restore compromised insulation.
After use, check the jaws for chipped edges, rust, or trapped debris, then clean and dry them. A stiff joint may need maintenance only as directed by the tool’s instructions. Do not apply lubricant to insulated surfaces. It is easy to focus on the cutting edges and overlook the handles; I’d make the insulation check part of the same routine every time. Safe habits can feel repetitive. That is the point.
Article Source:
Let's Work Together
The most innovative products come from the most innovative people - and for over 55 years our team has been propelled by curiosity and a steadfast dedication to inventing and creating the best foam formulations for our customers.